Making Blogger pretty

martin senn wire sculpture
{via here}
We are so obviously no longer in the typewriter age. And a blogging platform is a bit like this wire sculpture – we can fill in the blanks with colour and pattern and whatever we want to make it as individual as we are.
So use your blog as an expression of your brand!
I love blogging and I think it’s a really great thing to do for your business – to get your work out there, for getting to know your customers, for SEO benefits, and a whole lot more (if you’re still not convinced, read this). So I wanted to show you all how easy it is to set one up make it beautiful.
Unless you’re a tech-geek (in which case, you wouldn’t be reading this), there are two main platforms you can use to set yourself up a blog – Blogger and WordPress. Blogger is by far the easiest if you’re tech-challenged. (I’ll get to WordPress in the next post).
![]()
It’s really really SUPER easy to set up your own blog on Blogger – you only need a current Google account (with a .gmail address). Once you’re signed in, go to blogger.com (if you’re not already) and then click on the button that says “New blog” on the left. It’s a matter of following your nose really, so instead of going through the setup process, I thought I’d spend some time going through some of the things you can do next, to get it looking professional.
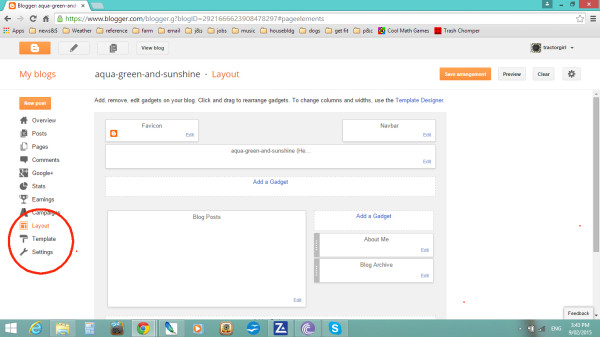
Let’s look at the Dashboard for Blogger. On the left, you’ll see a list of items; some of them are to do with how your blog looks, and some of them are to do with your visitor statistics, and whether or not you choose to have Google ads on your site (btw, I wouldn’t recommend getting into advertising if you’re only just setting up – it looks tacky). The difference between “Posts” and “Pages” is one you need to understand first up if you have a blog – “pages” are more or less permanent, static pages that you use in your site, like your Contact page or your About page. Some folk use them for the landing page (the page people first land on when they type in your website address), so that customers are presented with a standard set of information. “Posts” are the things you use for your actual blog, and are shown in the order in which they’re posted.
Today though, the items we are most interested in are the three towards the bottom in the picture above – Layout, Template, and Settings (circled in red).
1. Layout.
This is about what goes where on your blog – in your sidebar or footer (the area at the bottom of your page) you can add in any number of widgets (‘gadgets‘ as Blogger calls them here; they can be pre-set bits of code designed to do specific tasks, or you can add in your own html, text or pictures, or you can include links to other sites, show off your portfolio, etc). The layout on Blogger is ‘drag and drop’ too, so it’s very, very easy to get things where you want.
On the top left is the area for your favicon (a favicon is that little tiny square image that’s on the top of your computer’s tabs). The default is Blogger’s ‘B’ on the orange background, but of course you don’t want that so use the favicon to showcase your logo/colours! You can make up your own design pixel by pixel using one of the many favicon generators available online (e.g favicon.cc) , or you can just upload your own square picture, remembering of course that it’s tiny (16 x 16 pixels) and won’t show any detail.
On the top right is the Navbar (navigation bar), which has a search box, a bunch of sharing options, and an easy click-through to the “next” Blogger blog (actually fairly random, in my experience). Turn it off! You can easily add a search tool through one of your ‘gadgets’, and the rest of the Navbar is next to useless and makes your blog look unprofessional.
Add in your header image. Blogger suggests your header image should be 1080 pixels wide. Don’t have it too much less than this as your image will be stretched to fit, making it pixelated and ugly. And although it can be any height, somewhere around 200 pixels high is good. Blogger’s default format is to have an image with the blog title as floating text over the top. However, you can make your blog title and/or logo part of your header image so you don’t have to include that text. Not all systems support all fonts, which means that another system may use a default font instead of the one you’ve chosen, which can entirely change the look of your header; so incorporating text as part of your header image gets around this neatly.
Clicking on “Add a Gadget” will bring up a range of pre-set functions that you can add in, or you can use the “HTML/Javascript ” and add your own code. Every time you add on a new gadget, the Layout template updates so there is always another “add a gadget” box in that position, which means you can have an infinite number of gadgets in your sidebar if you wish. Then, you can drag and drop any of the boxes with a grey bar on their left, so use this to place everything in the order that you want.
To change your “About me”, you’ll have to click on your profile icon on the very top right of your screen. This profile image and information is used for ALL of your Blogger blogs, so keep that in mind when you’re choosing an image or writing about yourself if you have more than one blog (although remember you always change your profile info and image at any time – they’re not set in concrete). Alternatively, you can choose not to show the Blogger profile at all, and write your own “About” page instead.
And instead of using the default “Archive” gadget, which simply lists your post titles in chronological order, you might like to include the gadget that lists your most popular posts (click on “add a gadget” and scroll down to “Popular Posts”).
2. Template.
OK, this is where you can get super fancy schmancy. It’s pretty easy to choose whatever template you want – Blogger lets you preview them all with your blog details before you change anything permanently. To change it, click on “Template”, then below the preview of your blog, click on “customize“. You can then click through the various elements – “Background”, “Adjust width”, “Layout” (in the “Template Designer”, this option will let you change the overall layout, whereas “Layout” from the main Dashboard will let you add and drag elements around).
The most important thing in Template is “Advanced“, which lets you choose fonts, change and tweak font colours, backgrounds and various other elements. Have a play, and see what does what – nothing is permanently changed until you click on “Apply to blog” at the top right of your screen. I have found it does vary slightly between templates as to what elements are changed and how, so do your own experimenting until you’re happy. What’s good here especially is that there are various ways you can choose colour, including using specific hex keys (that’s the hashtag followed by 6 digits or letters, eg. #e31e3c) so you can get exactly the colour you want. There is also a good range of fonts to choose from to make your blog distinctive.
3. Settings
All the basic settings are straight forward. When it comes to attaching your blog to your own registered domain (a website address that you’ve paid for and own, such as https://tractorgirl.com.au), Blogger makes this nice and easy for you too, and they’ve got a very good help page to take you through the process. It’s totally worth it to have your own address and drop the ‘blogspot’ out of it – it looks infinitely more professional.
In “Posts & Comments”, use “Comment form message“, which will add a message to the head of your Comments box, such as “I read each and every one of your lovely comments, and I love hearing what you have to say! Thank you”. It makes it much more welcoming for readers, don’t you think?
*
Do you have any burning questions about Blogger? Any specific problems? Anything in particular you’d like to change on your blog but don’t know how? Let me know in the comments, and I’ll find you an answer!!
Or, are you proud of your blog? Share your link, so the world can see!
Julie x
Thanks so much for all this Julie. I’ll give the cache clearing thing a go, and yes it makes sense to make the favicon more obvious. I love your tractor! Will check out the link for the buttons. You’re an angel, thank you for doing my hard work for me. I have no idea about this stuff.
That’s OK Jane, it’s an absolute pleasure! I’m glad to be able to help.
Hi Julie, I jumped for joy when I read in my Minibus that you are showing those of us with Blogger blogs how to pretty things up. I love that you have made this post really easy to understand. I had a go at changing the favicon to a tiny photo of mine, and it comes up in the layout but doesn’t appear to be showing on the tab. I wonder if that is because I don’t have my own registered domain? I don’t make my potato jewellery any more so my blog is purely for love, not money. Another question I have, is how to add those nice buttons for pinterest, twitter etc. I have made links on a separate page heading for each, but I would prefer those buttons! Anyway Julie, only answer when you have time, this is not urgent but I would certainly like to make my blog easy on the eye. If anyone would like to drop by I share photos of the beauty around me from the countryside of the Dorrigo Plateau, mid north coast of New South Wales, which is verdant and surrounded by World Heritage rainforest. earthapplejane.blogspot.com ~ well that’s what it is at the moment. Perhaps I’ll be getting my own domain…….?
Bye for now and thanks, Jane
Hi Jane,
Every time I visit your blog, I am always so taken with how lovely your photographs are. It is obvious you have such a beautiful openness to and respect for nature.
Your favicon works! It shouldn’t make any difference whether you have your own domain or not. Sometimes when you change things on your blog, it doesn’t immediately show up at your end because your computer just uses things that it’s cached because it saves time to do it that way. Clear your cache, and it should show up.
I can see a little pic of two birds – although it took me a while to work out what they were. Because it’s SUCH a tiny space to work with, it’s probably best to use an image that is simple and easily recognisable – perhaps one obvious bird image, or a single flower?
If you want to add in some buttons for your social media, you’ll first have to have some icon images for the appropriate social media – either purchase some, or make them yourself. Those images need to be hosted somewhere (i.e. they need a URL where Blogger can find them), so if you don’t have your own webhosting, here’s a great work-around tutorial I found on YouTube on how to add them directly to Blogger so you can use them on your site. It’s by BlogaholicDesigns.etsy.com, and it’s easy! Enjoy. https://www.youtube.com/watch?v=H4hI5WmqpBw