ciabatta
After a discussion about bread on Twitter, my good friend Kellie from 74LimeLane requested that I share my favourite ciabatta recipe here. And why not? Good bread is GOOD.
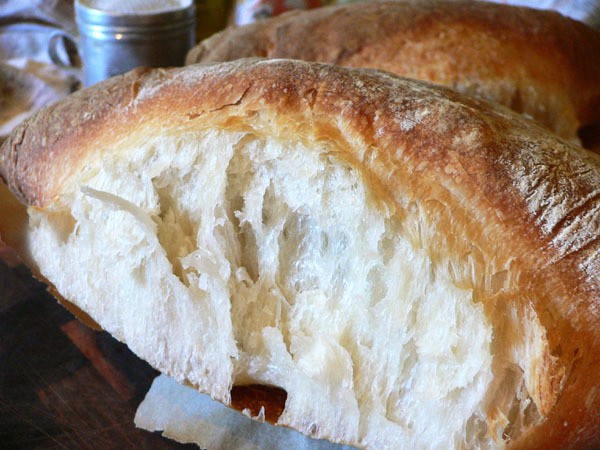
Ciabatta is Italian in origin, and the word literally translates as “slipper.” Not sure why – they don’t much look like footwear to me. And it’s certainly more flavoursome. Lumpy and rustic, a well-made ciabatta is a wonderful thing – crusty on the outside, chewy and delicious on the inside. Just smell, taste, and feel that golden homey goodness in your mouth… Perfect with soup, and fab for mopping up the last bit of sauce from your plate of pasta. Or just rub it with garlic, and add a drizzle of good olive oil. Yes, yes, YES!
Now listen, good ciabatta takes time. Don’t use those recipes that say you can make the whole lot in your breadmaking machine in a few hours – it will NOT have the same flavour and texture. You will need to take 24hours + 5 hours to do it right – it’s the development of the small amount of yeast over time that works the magic. The bread gets made in two parts – the biga or sponge is prepared first, and then it is added to the rest of the dough the next day. The dough is quite wet and gloopy to handle too (a bread machine is handy for this particular stage of mixing). However, I’d still only rate its overall difficulty as moderate – have a go if you know your way around the kitchen. Weighing your flour is a more accurate way of measuring it than using a cup measure.
{If, at this stage, you’ve decided you’d like to try something easier, here’s my very favouritest basic bread recipe. It’s the simplest, only 4 ingredients, and very satisfying to make, I promise!}
Like most bread recipes, there are countless variations on the basics. Ciabatta is no different – so here’s my version, adapted from a recipe here.
Biga (the morning before the baking)
1/2 tspn active dry yeast
1 cup warm water (about 40 deg. C)
330g breadmaking flour
3/4 cup water extra (see method for temperature)
Sprinkle the yeast into warm water, stir and let stand for 5-10 minutes.
Place the bread flour in a bowl. Stir the yeasted water again and then measure ONE teaspoon of it into the flour. (That’s right, throw the rest away – you only need 1/100 teaspoon yeast at this stage.)
Add in the extra 3/4 cup of water, using ice water in the summer and warm water in the winter. Thoroughly mix the biga; it will be stiff, but it has a long fermentation and will soften considerably. Add in an extra tablespoon or two of water if you absolutely must.
Cover tightly with plastic wrap and let the biga ferment for 24 hours in a cool spot in summer, or a warm spot in winter. Don’t worry if it does nothing for several hours, it should still double or triple in volume and smell aromatic the next day.
Bread (baking day)
325g breadmaking flour, plus an additional 1/3 cup for flouring dough, board and towels.
1 tspn dry active yeast
2 3/4 tspn salt
1 1/2 cups lukewarm water (about 30 deg C)
the fermented biga
Combine the flour, yeast and salt in the bowl of an electric mixer or bread machine. Stir in the water. Break the biga up into small bits about the size of a 5 cent piece, and add into the mix. Beat the mixture in your machine until the dough is fairly smooth, around 10 minutes. The dough should be quite sticky and soft, and easy to spread. If it is not, add a little more water until it is.
This next step takes around 3-3 1/2 hours all up. Firstly, scrape the dough into a bowl at least 3 times its size and cover it tightly with plastic wrap. Let it ferment for about 20 minutes. Then, sprinkle the top of the dough and your work surface with flour. Using a scraper to help, tip the dough out onto the work surface. Sprinkle the dough with flour again and then gently spread the dough out, trying not to deflate the bubbles. Fold it up into a tight bundle by folding the left side into the centre, then the right into the centre, then the top and the bottom. Place it into the bowl, smooth side up, and cover tightly again. You need to repeat this turning process a total of four times. After the fourth turn, cover the dough tightly again and leave it undisturbed for 1 1/2 to 2 hours, until it has about doubled in size.
Flour the top of the dough and the work surface again, and then turn the dough out. Cut the dough in half. Gently stretch the pieces out to about 30cm x 20cm, and fold them loosely into thirds, to form rectangles about 20 x 10cm. Try to handle the dough as little as possible to avoid deflating it.
Use some baking paper, or thoroughly flour a couple of teatowels and place one rectangle of dough on each, then sprinkle the dough with more flour. Place another piece of baking paper over the top and then gently fold a teatowel over to cover the lot. Leave the dough to prove in a warm spot for about 45 minutes, until they are soft and springy.
Heat the oven to very hot, 230deg C. When the dough is ready to bake, line a tray with baking paper, and gently flip the dough onto the tray, seam side up. Stretch them slightly until they are rectangular and dimple the dough all over with your fingertips. Bake the bread until they are well browned, about 35- 40 minutes.
Let them cool on a rack before slicing.
{OK. So that sounds like a lot – but it’s not really. It all comes down to these basic steps-
1. Prepare the biga. Knead and let it rest overnight.
2. The next day, mix the biga through with the rest of the dough, and knead it until it’s smooth.
3. Rest and fold the dough; rest and fold; rest and fold; rest and fold.
4. Rest for a couple more hours.
5. Fold the dough again, shape it and give it another short rest.
6. Bake.
See? Easy!}
SO. GOOD.
SO worth the effort! Delicious.
sounds delicious 🙂